I just wanted to start my wesbite on github pages. I tried to find the quick and easy to manage solution.
Jekyll is a quick start choice to build github pages.
I have divided the installation of jekll into two seperate posts.
- Install Jekyll for Local Machine (Window 10) Current one you are reading
- Install Jekyll for github-pages
In this post I will provide the details of my journey to install and run jekyll on window 10. I will try to summarize the processes and to support the one point solution to all the problems.
Step 1: Install Ruby
I installed Ruby+Devkit 3.1.2-1 (x64) which you can Download Ruby 3.1.2-1 (x64). Then after you will see the window.
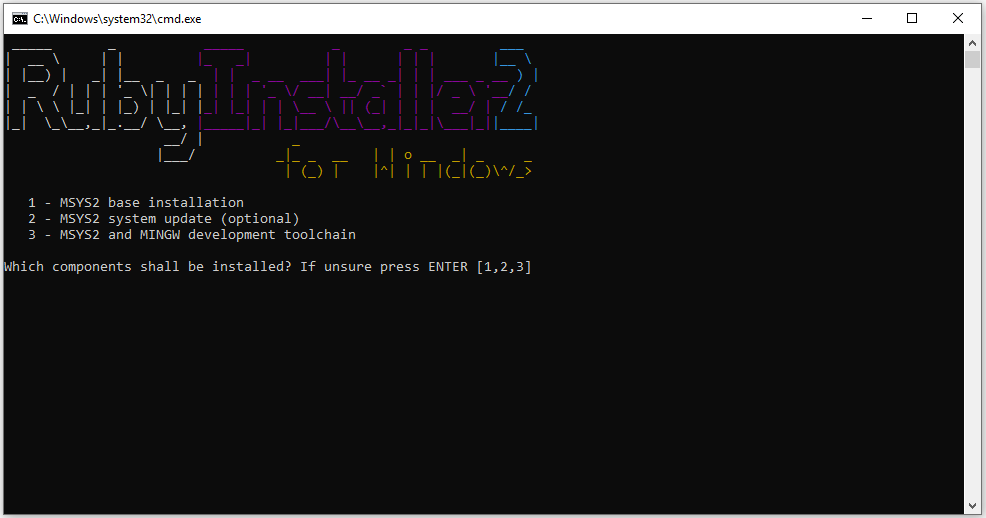 Photo Credit: https://stackify.com/install-ruby-on-windows-everything-you-need-to-get-going/
Install MSYS2 and MINGW development toolchain succeeded

 1 - MSYS2 base installation
 2 - MSYS2 system update (optional)
 3 - MSYS2 and MINGW development toolchain

Which components shall be installed? If unsure press ENTER []
Select the option 3.
Now you can check the installed version of ruby by entering command in the termninal.
$ ruby -vMy version is ruby 3.1.2p20 (2022-04-12 revision 4491bb740a) [x64-mingw-ucrt]
also verify your gem version
$ gem -vMy gem version is 3.3.18
Step 2: Install Jekyll
Jekyll comes in the form of a ruby Gem, an easy-to-install software package.
$ gem install jekyll bundler $ jekyll -vMy version is jekyll 4.2.2.
Problem 1: SSL certificate error
This was the first problem I encountered when I tried to install the jekyll. At this point the versions matter alot for the solution. So if you have encountered this problem. Please make sure that you have the exact versions installed. because the solution can be varying for different versions. When you will try to search the solution for this problem for me was the first answer in this stackoverflow question. open you gem file This is probably not the safe option but I tried couple of solutions
but only changing the source worked for me.
Solution
$ gem sources -r https://rubygems.org/
$ gem sources -a http://rubygems.org/
Step 3: Ceate your first static website
Now its time to head to the directory where you want to create your first website.
$ jekyll new musings_of_a_tenderfoot
$ cd musings_of_a_tenderfoot
musings_of_a_tenderfoot is the name of the site. This command creates the structure of the website file.
├── 404.html
├── about.markdown
├── _config.yml
├── Gemfile
├── Gemfile.lock
├── index.markdown
├── _posts
│   └── 2020-09-14-welcome-to-jekyll.markdown
└── _site
Now run the command in the terminal to build the website and execute locally.
$ bundle exec jekyll serveProblem 1: Webricks
`require': cannot load such file -- webrick (LoadError)
Solution:
$ bundle add webrickif you will again see the SSL error. Please open the Gemfile in the same folder. In the first line you will see the source
$ source "https://rubygems.org"change it to
$ source "http://rubygems.org"then add webrick.
Helpful Links:
This post is a good starting point to begin the journey. This blog provide a one point to start creating the website posts and to customize the site.